How to Color Match Your ColorEdge Monitor and Photo Prints
Monitor Adjustment Continued - ColorNavigator Elements
The next section is a continuation of the ColorNavigator Elements 4-step guide.
3. Import the Displayed Photo
Once you have printed, return to ColorNavigator Elements while keeping the photo displayed in your image retouching software. Click the “Capture” button at the top of the screen.


Read the explanation and click “OK”.

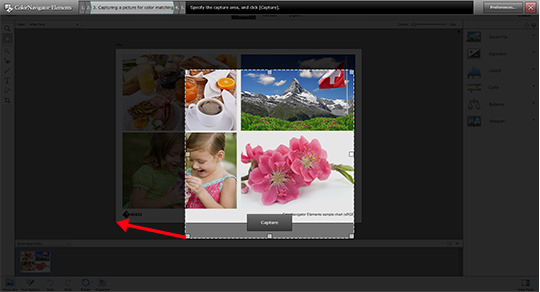
Drag the corners of the frame to enlarge it to fit the exact size of the picture in your image retouching software.
When you are done, click “Capture”.
|
|
|
|
|
|
 |

4. Adjust the screen to match the printed photo
Preview the imported photo in ColorNavigator Elements. Just as before, adjust the monitor while comparing it to the printed photo.
- Make sure to compare once the ink has dried.

1.Move the Luminance slider left or right to match the brightness of the preview window to the print.

2.Select the thumbnail that most closely matches the printed photo from the 9 samples. The image you select will be displayed on the left. Use the "Undo" and "Redo" buttons at the top to easily return so you can find the closest matching image. Use the slider at the bottom to adjust the image. Increase your matching precision by carefully fine-tuning the image.

3.Once color matching is finished, click the “Complete Adjustment” button on the top-right.

- After step 2, perform as needed:
 |
Under the “Feature Colors” tab, you can separately adjust Skin Tone and Sky Tone, which tend to be difficult to match visually. |
Excessive adjustment can influence other colors and should be avoided.
The adjustment results are saved to the built-in correction sensor.
Click “OK” for the correction sensor to appear from the top of the monitor. It will save the adjustment values in just a few seconds.
Every 200 hours, the built-in correction sensor will automatically correct the display when the monitor is not being used.

|
|
Click the "Preferences" button on the top-right corner to change the correction timing in 50 hour interval. (Initial setting is 200 hours.) |

The Complete window will appear and you can change the name of the adjustment. Enter a name, such as a kind of photo pring paper or date, and click "Exit."

Now you can match the colors of images displayed in image retouching software and printed photos.


-
If you could not successfully match the colors, there may be a problem with your printer settings or performance.
If you would like to check how efficiently your printer displays each color, use this sample image.
 |

- You can use the above map to return to any section of this guide.


